Publica tus paquetes de Dynamics 365 for Finance and Operation en LCS con Azure DevOps Pipelines
Índice
La primera tarea de automatización para cerrar el ciclo de integración continua en Dynamics 365 for Finance and Operations con Azure DevOps pipelines fue publicada recientemente, como se describe en el anuncio oficial.
Estas son algunas instrucciones a alto nivel para configurarlo mientras se publica la documentación oficial:
Prerrequisitos
Para simplificar, estos prerrequisitos deben estar preparados antes de comenzar este proceso:
- Necesitas una compilación en ejecución de Dynamics 365 Finance and Operations, y por tanto un proyecto de LCS vinculado a esta instancia de DevOps. Este artículo asume que tienes una compilación configurada desplegando una máquina virtual de topología de compilación desde LCS como se explica aquí.
- Instala la extensión Dynamics 365 Unified Operations Tools desde el Visual Studio Marketplace en este enlace: https://marketplace.visualstudio.com/items?itemName=Dyn365FinOps.dynamics365-finops-tools
También prepara:
- Un usuario con permisos suficientes en tu proyecto de LCS (debes conocer el usuario y la contraseña). Considera usar una cuenta de servicio cuya contraseña no expire y que no use 2FA.
- Acceso a la administración de Azure Active Directory de tu organización, con permisos suficientes para registrar una nueva Aplicación en AAD (esto solo debe hacerse una vez), como se explica en el siguiente paso.
1. Registrar una Aplicación en AAD (Nueva versión)
Para autorizar a Azure DevOps Pipelines a conectarse con la nueva API de Lifecycle Services (LCS), debe crearse una aplicación en el Azure Active Directory de la organización (Se requieren permisos elevados para esta operación).
- Ve a portal.azure.com y busca o navega hasta Azure Active Directory.
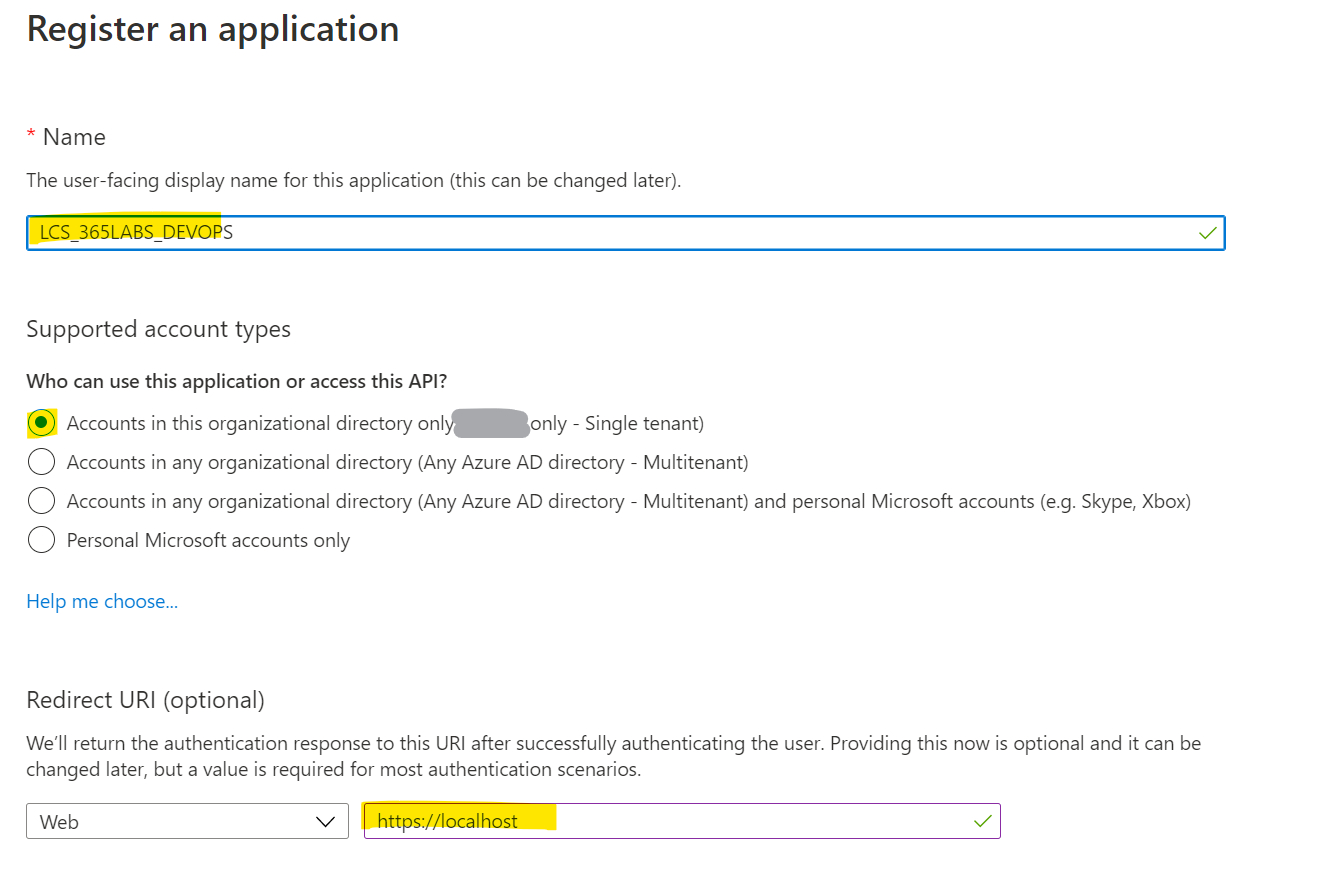
- Navega al submenú Registros de aplicaciones > Nuevo registro
- Ponle un nombre descriptivo a tu elección y selecciona Cuentas solo en este directorio organizativo (solo tu dominio - inquilino único)
- En URI de redirección (opcional), escribe https://localhost
- Haz clic en Registrar
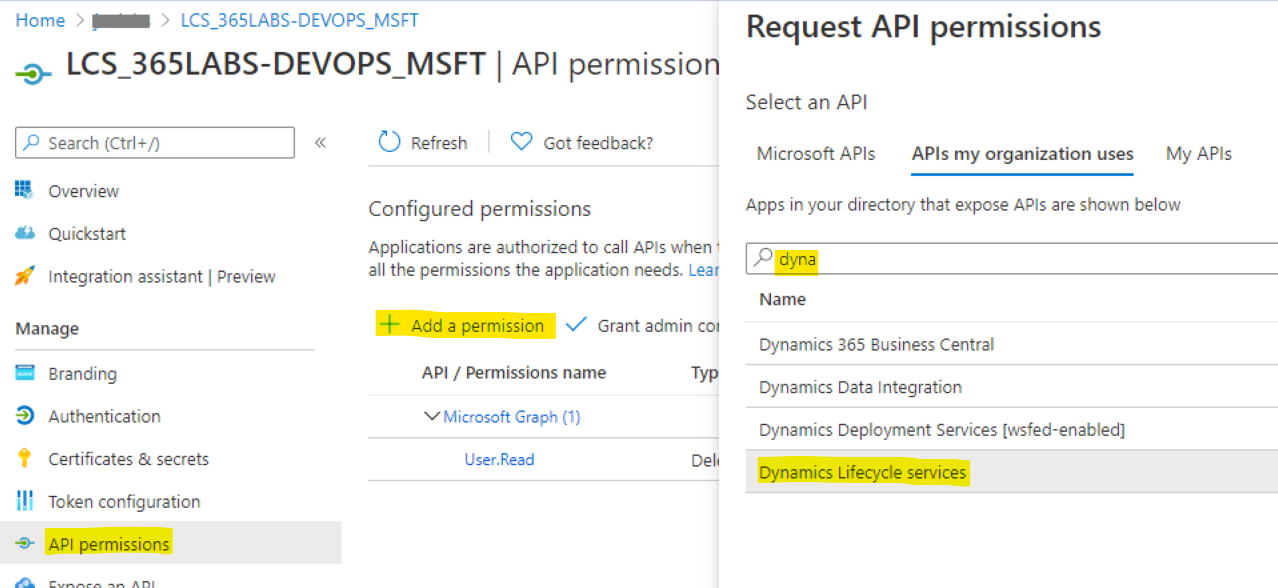
- Haz clic en Permisos de API > Agregar un permiso
- Busca “Dynamics” (normalmente es más fácil en la pestaña “API usadas por mi organización”) y selecciona Dynamics Lifecycle services
- Haz clic y selecciona el permiso user_impersonation y el botón Agregar permisos.
- Haz clic en Conceder consentimiento de administrador para tu dominio, responde Sí y espera la confirmación; El estado debe cambiar a Concedido para tu dominio
- Ve al menú Autenticación y asegúrate de que Tratar la aplicación como un cliente público esté en Sí (esto reemplaza el antiguo proceso de registro de “Aplicación nativa”)
- Haz clic en Guardar y la aplicación recién creada estará lista.

Más información
2. Crear el Pipeline de Release en Azure DevOps
Se utilizará un pipeline de release para conectar la salida de la compilación con la Asset Library en LCS. Los nuevos paquetes de compilación se cargarán automáticamente en LCS a través de este pipeline.
- Inicia sesión en el proyecto de Azure DevOps de tu organización y navega a Pipelines > Releases.
- Haz clic en Nuevo pipeline de release (es la única opción disponible si aún no tienes ningún pipeline creado).
- Selecciona una plantilla: Trabajo vacío.
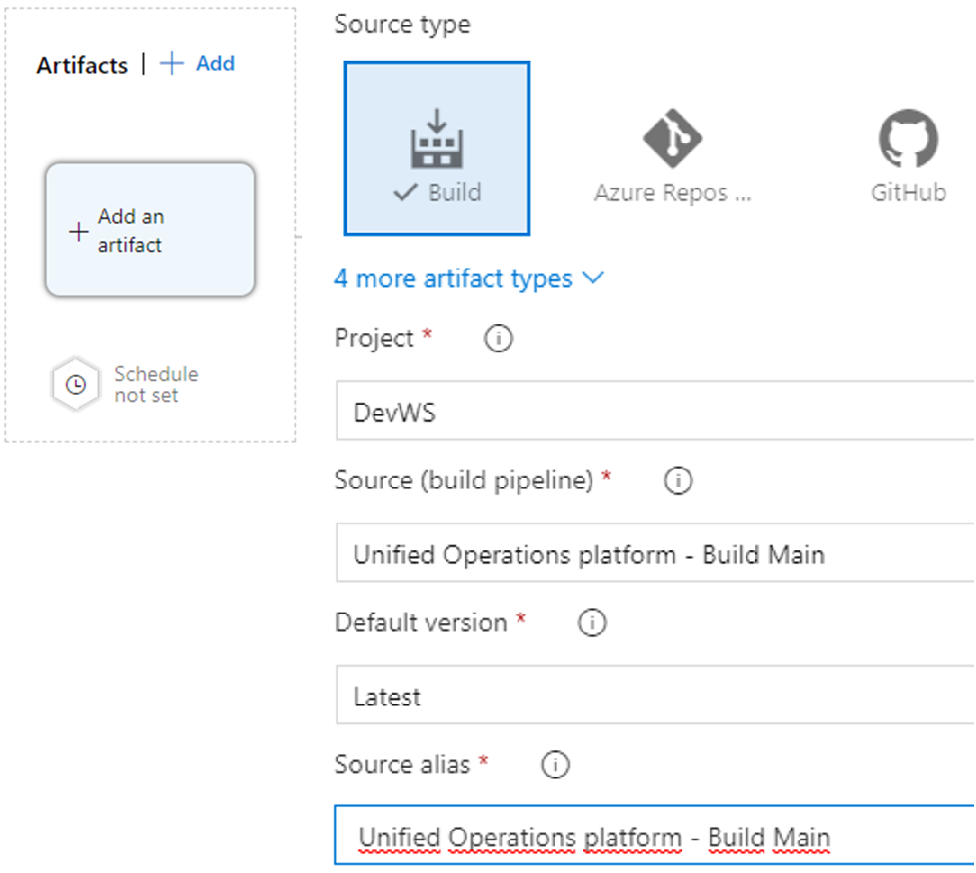
- Haz clic en Artefactos > +Agregar un artefacto (esto conectará este pipeline de release con una compilación).
- Selecciona Build como Tipo de origen, y selecciona tu Proyecto, Origen y Versión predeterminada (usa Latest si este release debe ejecutarse automáticamente) y finalmente haz clic en Agregar.
- Si quieres que este release se ejecute inmediatamente después de que termine la compilación (para que la salida se cargue en LCS cada vez), habilita la opción de Integración Continua usando el pequeño icono resaltado en azul en la siguiente captura (C.I.).
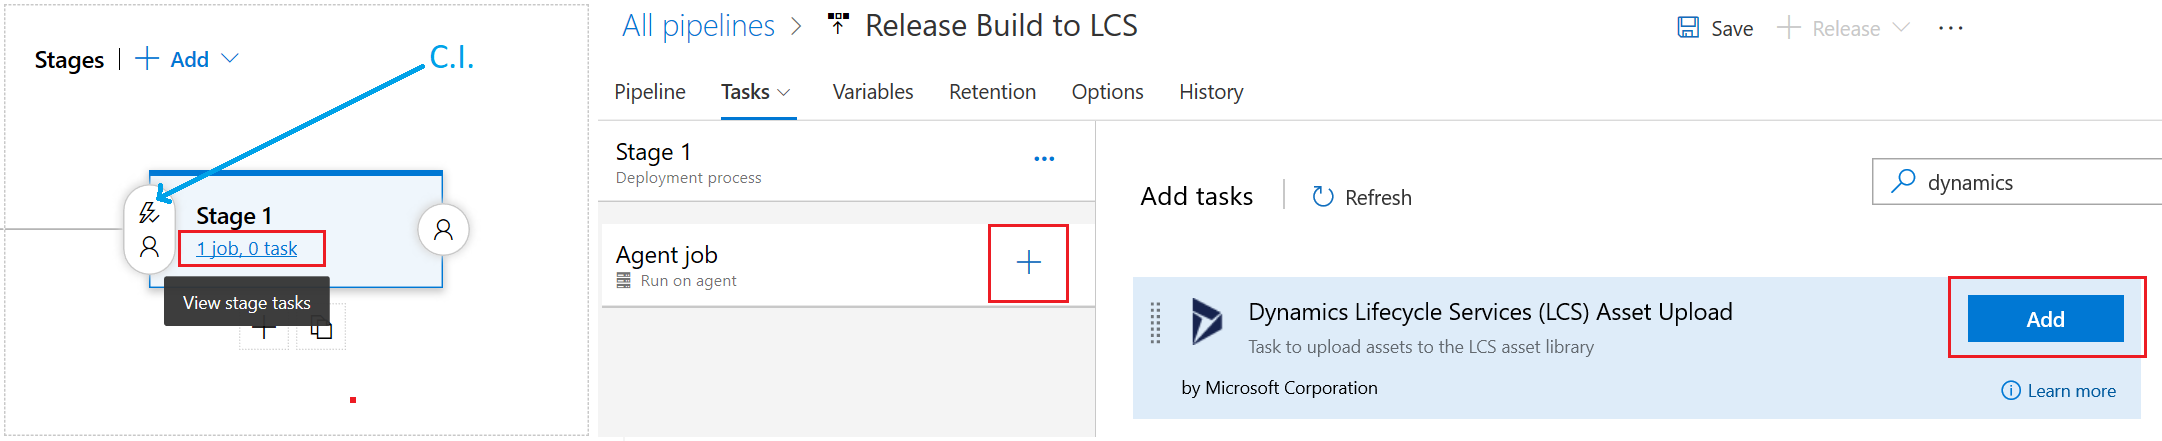
- Haz clic en el enlace Stage 1 o Tasks para abrir los detalles.
- Selecciona el nodo Agent job y valida que el parámetro Agent pool esté en Hosted VS2017.
- Haz clic en el botón
+en el nodo Agent Job. - Busca la tarea Dynamics Lifecycle Services (LCS) Asset Upload (debería estar ya instalada o puede instalarse en este punto, haz clic en Actualizar si no aparece en la lista) y finalmente haz clic en Agregar para añadir la tarea al pipeline.
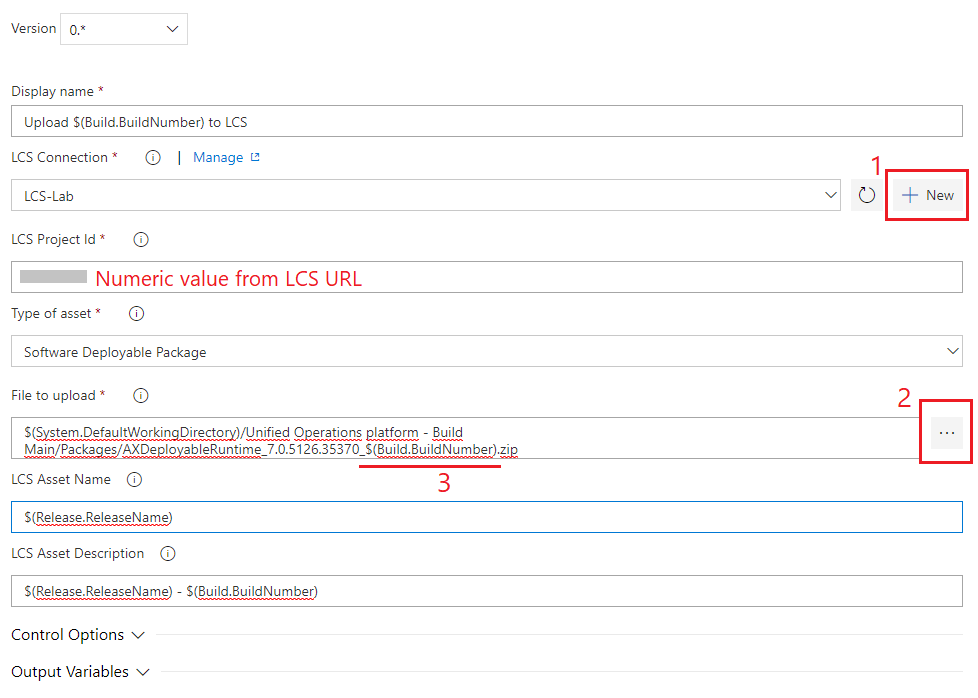
- Rellena estas propiedades en la nueva tarea creada, por ejemplo:
LCS Connection: Selecciona una conexión o haz clic en
+Newsi es la primera vez:- Nombre de la conexión: usa un nombre descriptivo (en caso de tener varios proyectos LCS).
- Authentication Endpoint: deja el valor por defecto.
- Lifecycle Services API Endpoint:
- Si tu URL de LCS es:
https://lcs.dynamics.com, usa el valorhttps://lcsapi.lcs.dynamics.com(por defecto y más común). - Si tu URL de LCS es:
https://eu.lcs.dynamics.com(nota la parte'eu') usa el valorhttps://lcsapi.eu.lcs.dynamics.com.
- Si tu URL de LCS es:
- Usuario y Contraseña: usa las credenciales (nombre de usuario completo incluyendo dominio y contraseña) de un usuario con permisos suficientes para subir archivos a tu proyecto LCS.
- ID de aplicación (Cliente): usa el guid de la aplicación AAD creada previamente. Debes haberlo guardado del primer paso.
LCS Project Id: es el valor numérico incluido en la URL de tu proyecto LCS.
- Ejemplo: si tu URL es
https://lcs.dynamics.com/V2/ProjectOverview/1234567, tu Project Id es1234567.
- Ejemplo: si tu URL es
Tipo de asset: Software Deployable Package.
Archivo a subir: haz clic en el botón
...para seleccionar el archivoAXDeployableRuntime_XXX_YYY.zipen la carpeta Packages de tu artefacto de compilación.- Esta es la configuración por defecto, puedes seleccionar un archivo diferente si tu definición de compilación está personalizada, pero debe ser un paquete desplegable y su nombre debe incluir el número de compilación.
- De vuelta en las propiedades del Pipeline, reemplaza el número de compilación por la variable $(Build.BuildNumber)
- Ejemplo, para el nombre de archivo:
$(System.DefaultWorkingDirectory)/Unified Operations platform - Build Main/Packages/AXDeployableRuntime_7.0.5126.35370_2019.1.29.1.zip, usa el valor de propiedad:$(System.DefaultWorkingDirectory)/Unified Operations platform - Build Main/Packages/AXDeployableRuntime_7.0.5126.35370_$(Build.BuildNumber).zip
- Ejemplo, para el nombre de archivo:
LCS Asset Name y LCS Asset Description: Usa valores descriptivos para identificar este paquete en la lista cuando se suba a la Asset Library de LCS. Más información sobre variables de Azure Pipeline en la documentación aquí para la build y aquí para el release.
- Ejemplo:
$(Release.ReleaseName)-$(Build.BuildNumber)
- Ejemplo:
Se verá más o menos así:
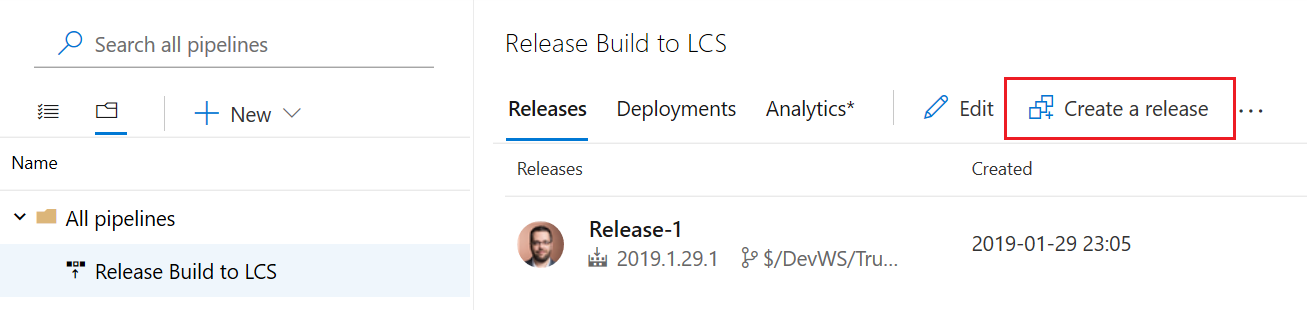
3. ¡Listo! ¿y ahora qué?
Usa el botón Create a release para crear un nuevo release manualmente (o lanza una compilación, si configuraste el disparador de Integración Continua):
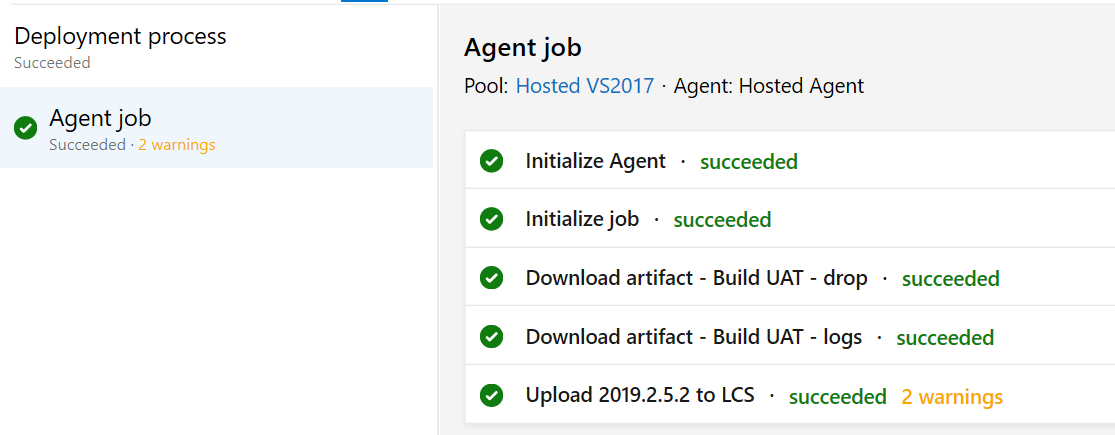
Con suerte, tus resultados se verán así (si no, revisa los logs para entender qué ocurre, el error más común hasta ahora es la autenticación con la app de AAD):
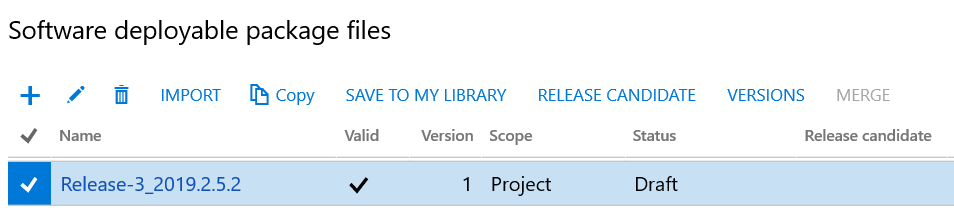
Si todo fue bien, tendrás un nuevo archivo en la carpeta Software deployable package de la Asset Library de LCS.
Para más información sobre este release y el proceso de configuración revisa el anuncio oficial aquí y este post de blog.
Espero que estas instrucciones te ayuden a entender cómo configurar esta primera tarea de automatización, que ojalá no sea la última. Consulta la documentación para próximos cambios sobre Herramientas de desarrollo y gestión del ciclo de vida de aplicaciones.
Publicado primero en “Dynamics AX in the Field”, el blog del equipo de Premier Field Engineering de Microsoft.
Última actualización — Oct/2020:
- Nuevas capturas de pantalla ya que el Registro de Aplicaciones en AAD (paso #1) ha cambiado significativamente.
- Corregidos algunos hipervínculos.
- Pequeños errores tipográficos corregidos.
Última actualización — Sept/2022:
- Recuperadas capturas de pantalla perdidas a petición de los lectores.
- Corregido el marcado, enlaces rotos y algunos errores tipográficos.
Publicaciones en esta serie
- Publica Tus Paquetes De Dynamics 365 for Finance and Operation en LCS Con Azure DevOps Pipelines
- ¿Por Qué Deberías Usar Team Foundation Server Para La Gestión Del Ciclo De Vida De Dynamics AX?