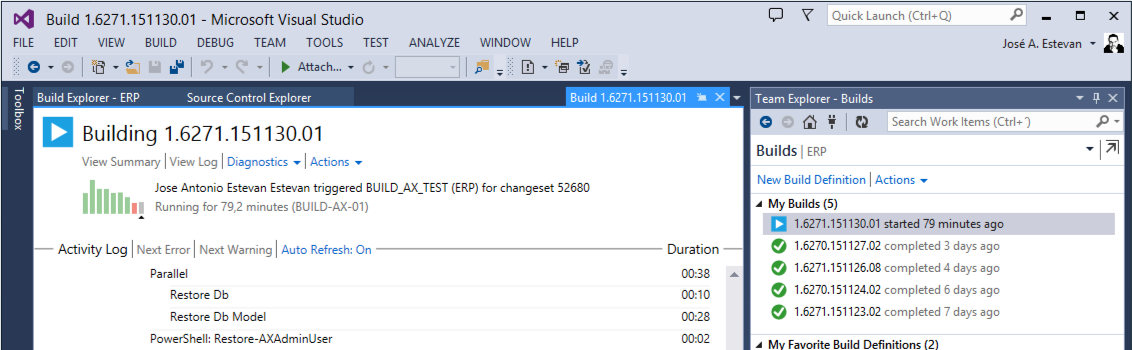
Automatic BUILD Processes with TFS and AX 2012 (1/2) (ALM-IX)
Table of contents
In the previous posts of this series we have seen how to configure a TFS server (local or in the cloud) and how to use it to manage our tasks, control the source code and manage versions through branches, among other things. To close the circle we must process all that information, code and versions into something we can deliver to our clients/users.
This is where automatic build and compilation processes come in, called Build processes. Running a Build in TFS is relatively simple if we work with .NET languages, but to do it with AX we’ll have to work a bit beforehand to prepare the environment and install the necessary components on the servers.
We have a fairly good summary of the necessary components at the general level in the following link. The components to install will depend on whether we use an on-premise TFS or in the cloud.
First we must familiarize ourselves with some key concepts:
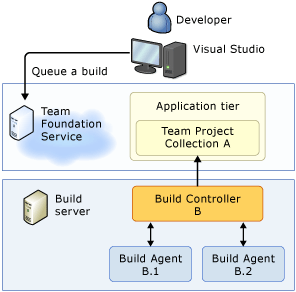
- Build Service: Service that accepts Build execution requests.
- A service is associated with a project collection in TFS.
- We usually only need one service per project collection.
- Build Controller: Orchestrates the Build and delegates the work to the Build Agents.
- A controller is associated with a Build service.
- We may need multiple controllers if we have multiple environments ready to run Build. In that case we’ll assign the agents to each controller to create different process queues.
- Build Agent: Service that performs the Build.
- An agent registers with a controller
- Must be installed on the same machine as the AOS that will execute the process
- One agent must be installed for each AOS we have processing Build.
It’s possible to install and run multiple services, controllers and agents, but to get started one of each is enough. In our case it’s necessary that all these components are installed on our servers, since they’re going to require using instances of AX. But the source code can be in a TFS instance in the cloud without any problem, each component can be on different servers, as shown in the following diagram:
Preparing the Necessary Components for AX 2012
The Build process is basically a workflow process in which actions are executed step by step. In TFS, these actions are called Activities and the file that stores the workflow is called Template. TFS’s default installation comes with templates and activities ready to compile .NET projects without any effort. But as we know, compiling AX applications is not that simple so we must create our own template that performs a custom process, using activities also customized to perform AX-specific actions such as synchronizing the database, compiling CIL, etc. Microsoft doesn’t officially have these templates, although de facto everyone uses those published in the Dynamics AX Admin Utilities project, originally created by Joris de Gruyter (along with a series of articles starting here) and to which other community members contribute. The first thing we’ll do is download the activities and example template from the CodePlex site itself. The version to download will depend on your version of TFS and AX (they also exist for 2009, although they are outside the scope of this article):
- Download activities
- Download example template (download and unzip the ZIP) To facilitate our work, we’ll prepare a project to work with and upload the assemblies to the TFS source control. To do this we do the following:
- Create a new project or solution in Visual Studio
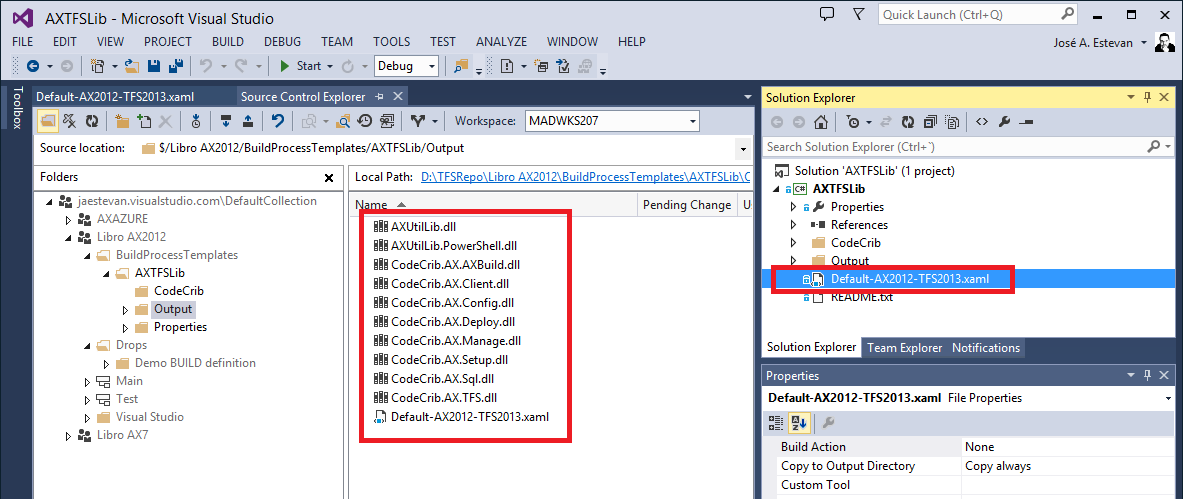
- Add all the libraries we downloaded to the project. In the VS project we can create folders to keep the files organized. I’m going to put them in a folder called CodeCrib.
- As a personal tip, I also add to this folder the AXUtilLib.dll and AXUtilLib.PowerShell.dll assemblies, which we can find in some AX server we have available, by default in the folder
C:\Program Files\Microsoft Dynamics AX\60\ManagementUtilities\ - Add all these assemblies as References of the new project. In the folder References > Add references > Browse and choose the folder where we put them, inside the project. Select them all and OK.
- We also include the example template downloaded previously, it’s a XAML file (don’t upload the ZIP!).
- We upload the entire project to a folder in our source code. By default TFS projects include a BuildProcessTemplates folder, this is a good place to put our libraries.
- Once everything is organized and uploaded to source control, the project looks more or less like this:
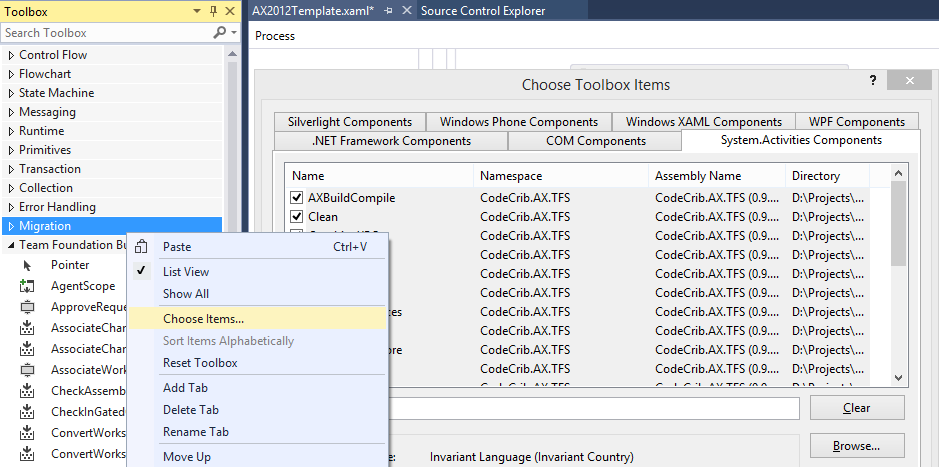
- One final step is to tell Visual Studio where the custom activities are. To do this we right-click on some node of the Toolbox of activities, choose Choose Items and in System.Activities we use the Browse button to search for the CodeCrib.AX.TFS file. This adds all activities for AX to the list, we select all of them and click OK.
- Later we’ll need all this, but for now save everything, check-in to source control and continue installing components.
Install TFS Build Services on Our Servers
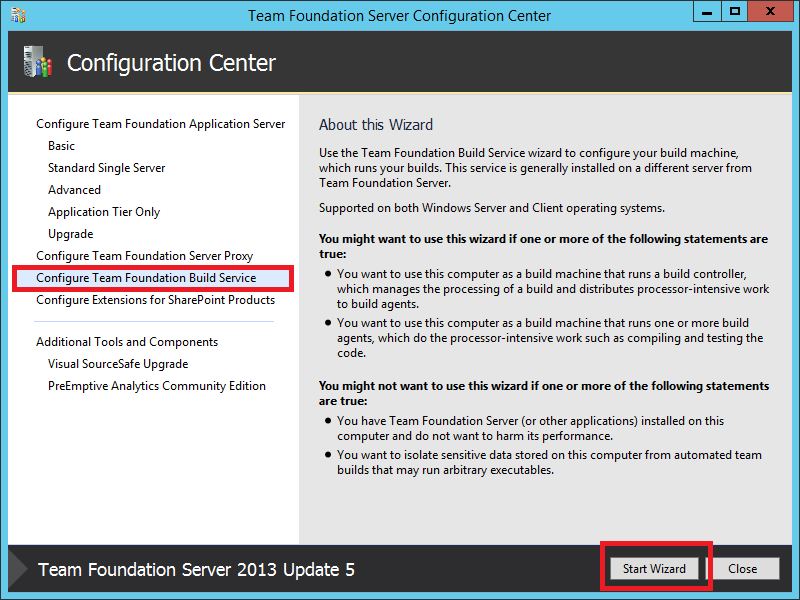
Next we’ll install the necessary components to run TFS Builds on our servers. If you’ve already installed some Build service you can skip to the next step. As we mentioned earlier, whether we use a TFS in the cloud or on our servers, the components necessary to run AX during Builds must be mandatorily installed on local machines. Keep in mind that to run these components you need very high permissions in the TFS project collection and on the server where they’re installed. If we don’t have any component installed yet, we use the TFS installer to start the setup wizard for a new Build service.
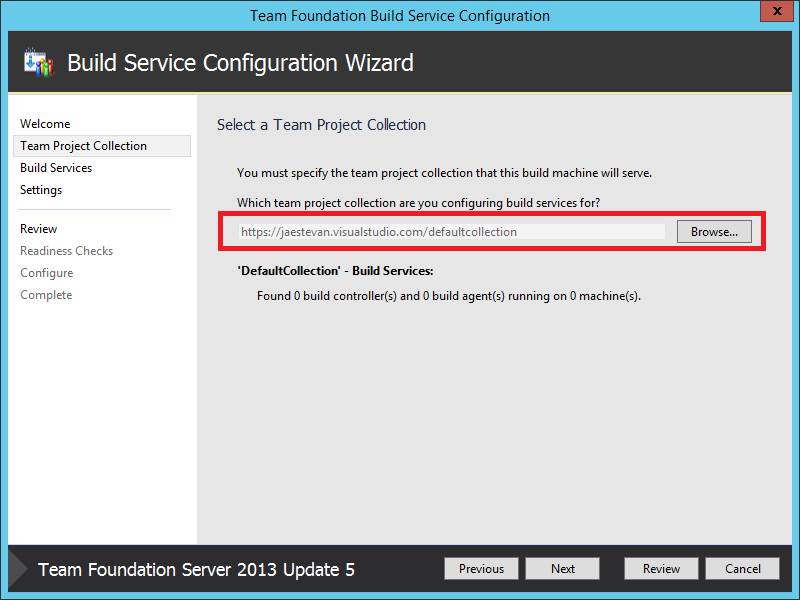
- We start by connecting to our TFS instance (either on-premise or in the cloud) to indicate the URL of our project collection.
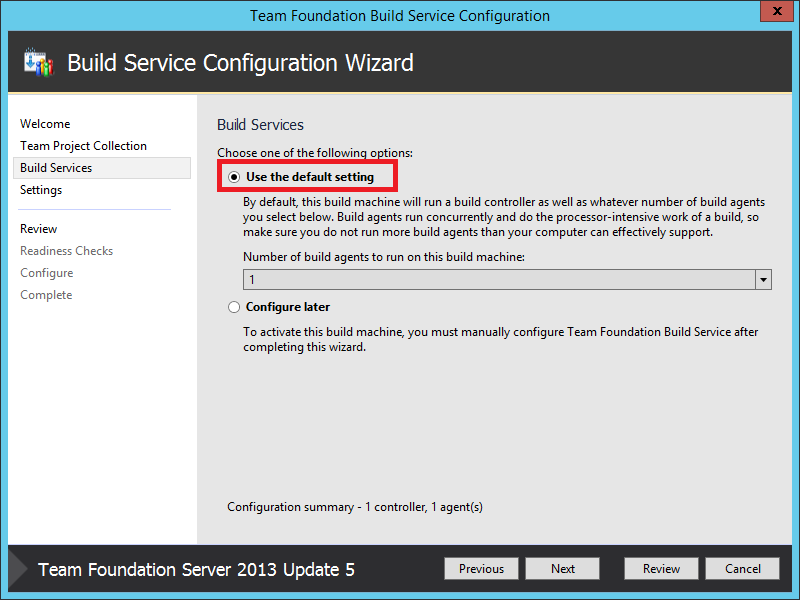
- In the next step we choose to install a single Build service with the default options.
- We specify a domain user in charge of running the service. It’s recommended to use a dedicated user for this task, but for now I’ll use the Administrator for this demo.
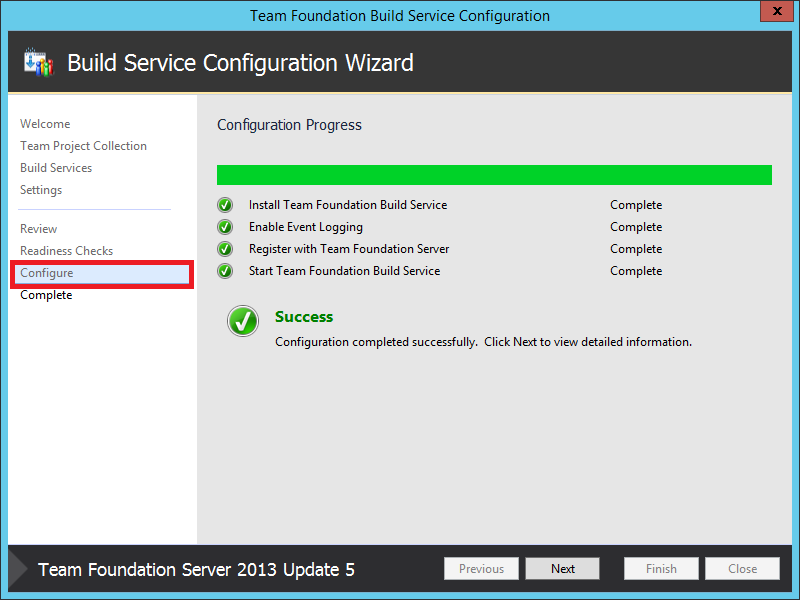
- When the wizard finishes the installation, we click the Configure button and if all goes well, the installation is complete.
Configure TFS Build Services to Work with AX 2012
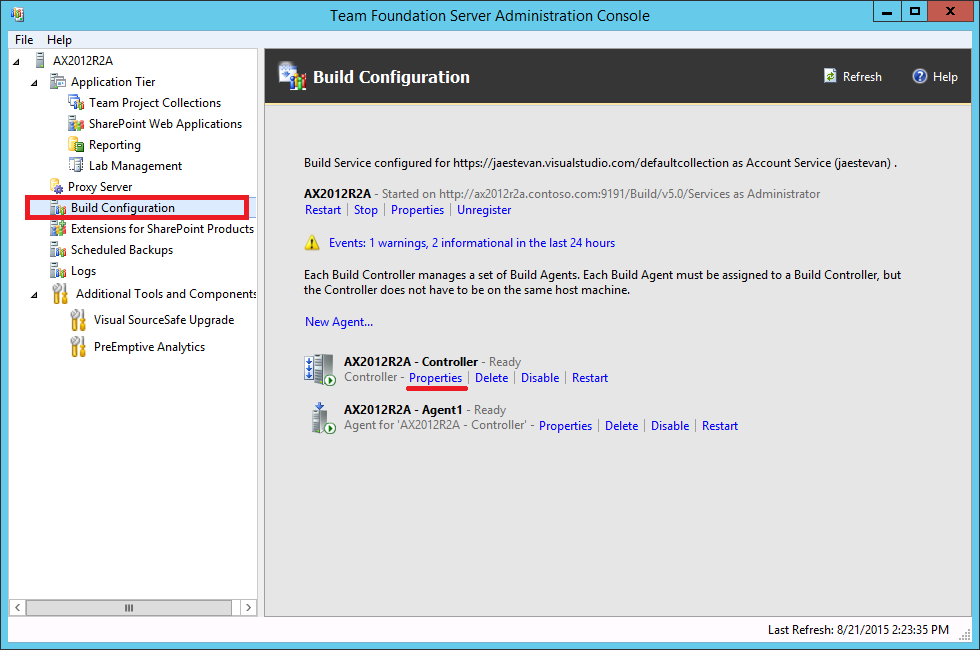
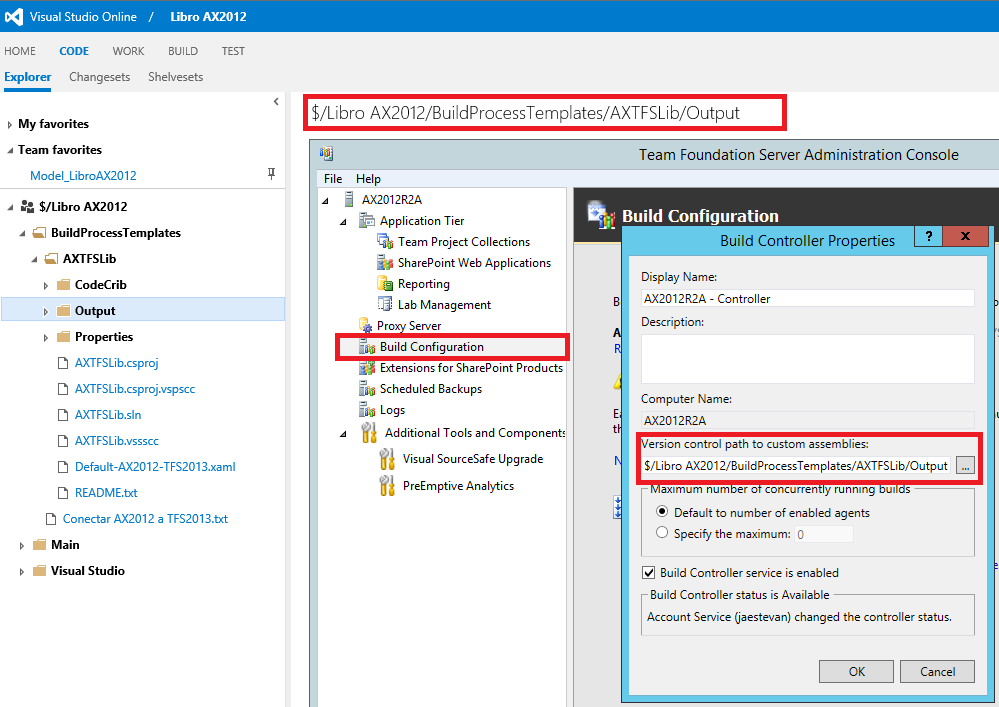
If at this point we go to Visual Studio and try to run a new Build, we can select the newly installed controller/service. But we’ll only be able to choose the default Visual Studio templates dedicated to compiling .NET solutions. To tell TFS that we must run our own workflow we still need some additional configuration. We use the Team Foundation Server Administration Console to configure the properties, first, of the newly installed controller. Here we can change the name of the controller and the maximum number of concurrent Builds (should be 1 at most). But most importantly, we can tell the controller where our custom assemblies are. We’ll use the Version control path to custom assemblies property to indicate the source code folder where we uploaded our custom assemblies with the activities we’ll use in the AX 2012 Builds.
Run Our First AX 2012 Build in TFS
We’ve already installed and configured what’s necessary to run our first Build of our source code, to do this we do the following:
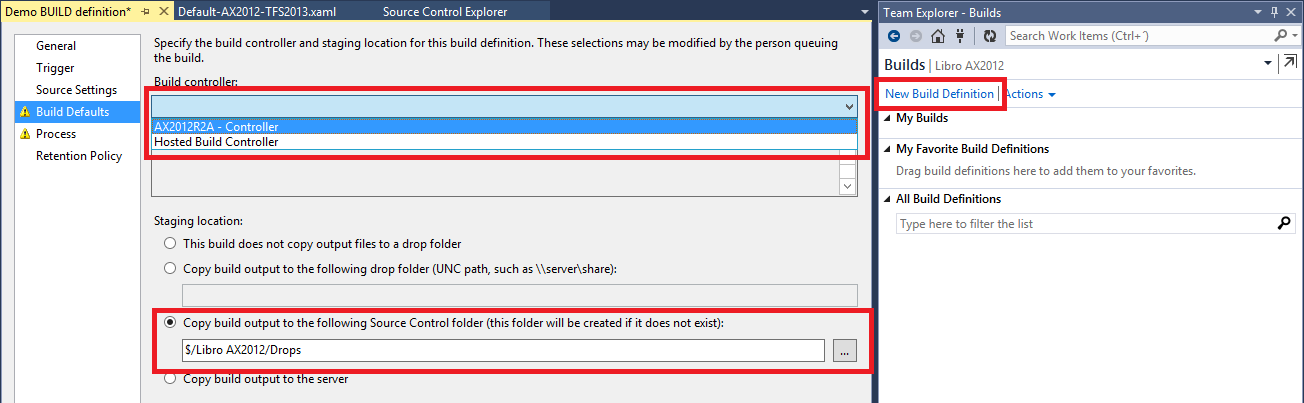
- In Visual Studio we go to the Team Explorer > Builds panel and choose New Build Definition to create a new definition. This is the definition we’ll use from now on to run and review our process, we can create as many definitions as we want, with different input parameters and associated with the same or different templates.
- In the Build Defaults tab we choose our controller and where we want the Build to put the output files of the process. These files will depend on our needs and the process that actually runs in the template. In the case of AX it can be a model, a Model Store, etc. We can store these files in the version control itself or in a folder on a file server for example. In case of Build processes that only serve us to check the compilation of objects we can indicate that these files are not saved to save some disk space.
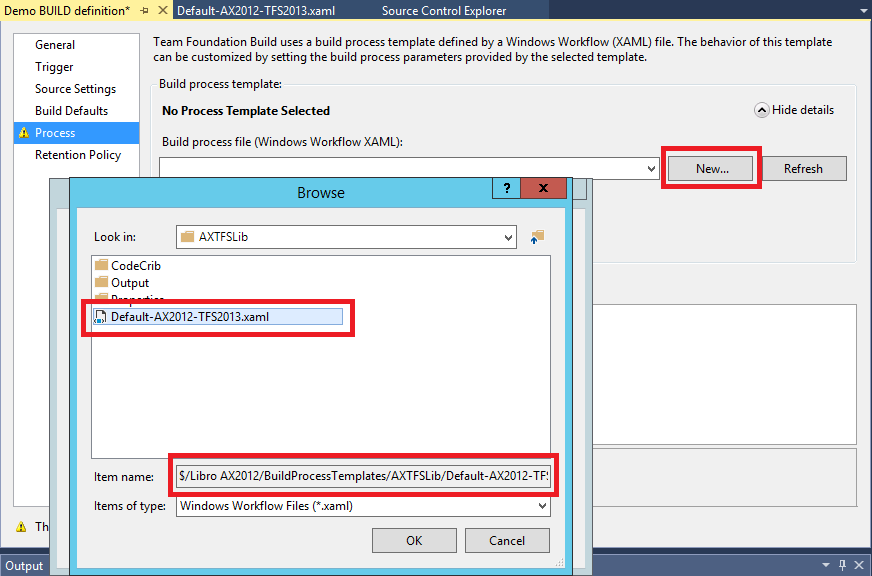
- In the Process tab we choose the template we want to run and the input parameters of this template. Since this is the first time we’re using our template for AX 2012 it doesn’t appear in the dropdown. We click New and search for it in the folder where we saved it inside the source code.
- Once the template is chosen, the form is updated with the parameters defined in it. The template we downloaded from Joris’s website only asks us for the path of a configuration file that the Build process will use to connect to an AOS instance to execute all the work. It must be a dedicated environment for this task and be installed on the same server where we installed the controller.
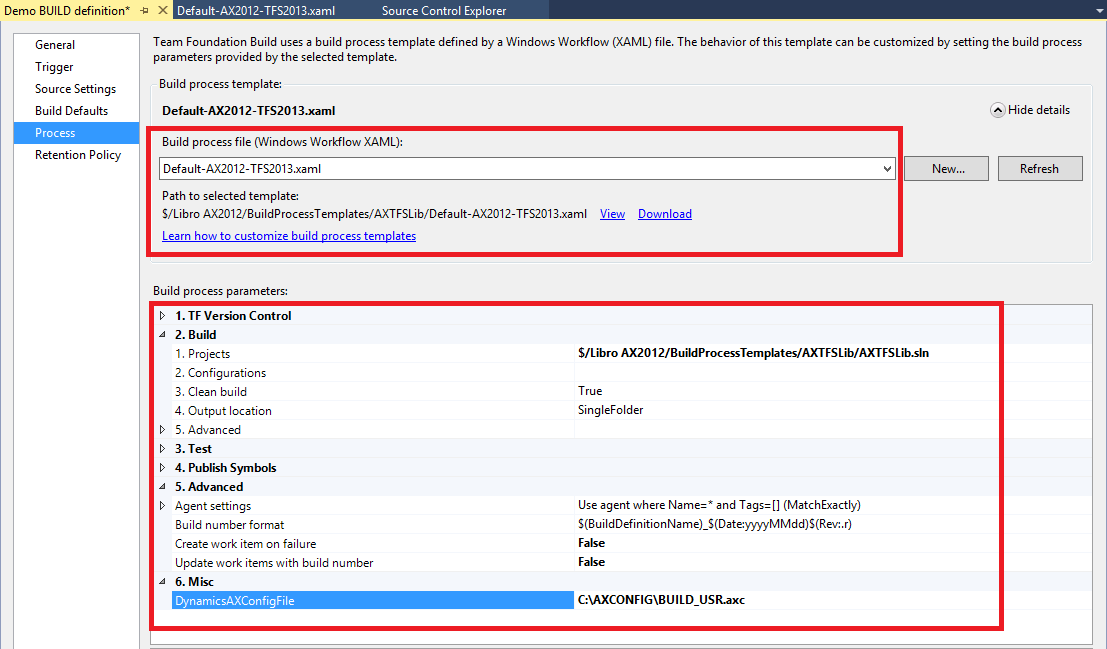
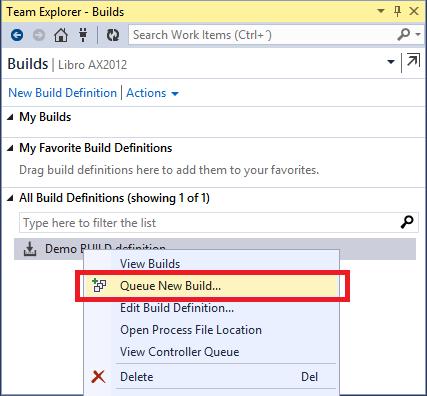
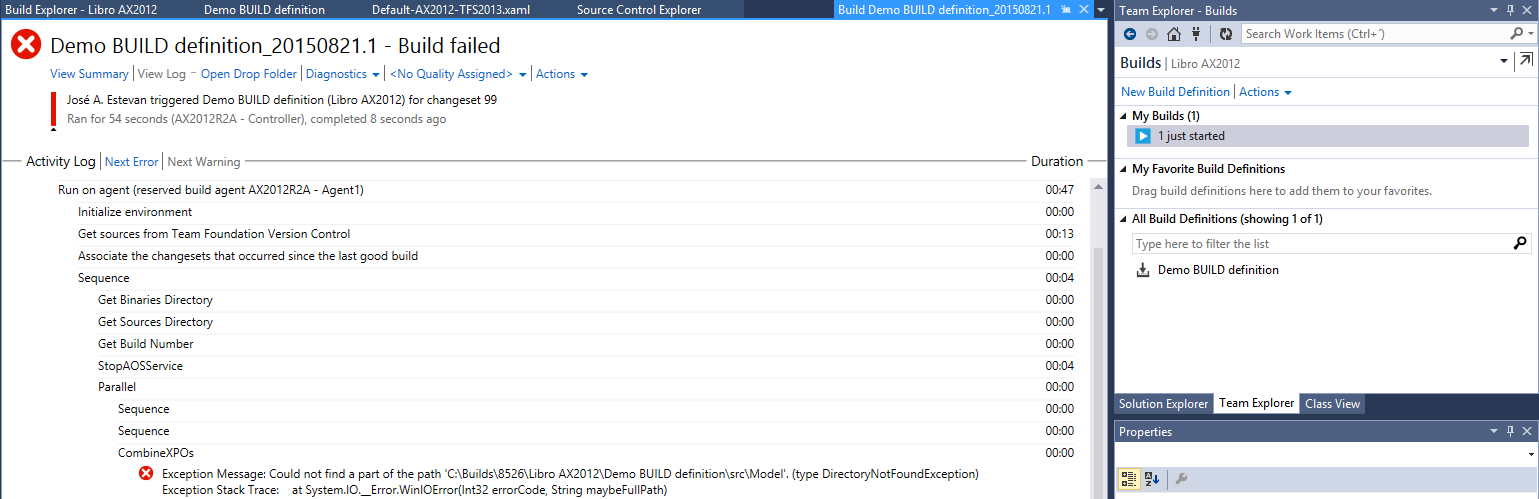
- We save the process definition and we can already run it from Visual Studio or from the TFS website (either in the cloud or locally). The process will probably fail, since Joris’s template is designed for his server and environment, it’s almost impossible to make a universal template in the case of AX.
- In any case the Build will show us a log with what happened to allow us to correct any inconsistency. We can always go back to this log from the Build history in Visual Studio or on the TFS website, and we can also consult the output folder of the Build that we configured earlier, where the process saves a very detailed log of each activity and its result.
This has become already too long, so we’ll see how to fix it and create our own templates in the second and final part of this article :)
Posts in this series
- Automatic BUILD Processes with TFS and AX 2012 (2/2) (ALM-X)
- Automatic BUILD Processes with TFS and AX 2012 (1/2) (ALM-IX)
- Microsoft Dynamics AX 2012 Label Codes Using Team Foundation Server Branches (ALM-VIII)
- Version Control in Microsoft Dynamics AX 2012 Using Team Foundation Server Branches (ALM-VII)
- Source Code Control with TFS in Microsoft Dynamics AX 2012 (ALM-VI)
- Read Team Foundation Server Items from Microsoft Dynamics AX 2012 (ALM-V)
- Download Microsoft Dynamics AX 2012 Application from Team Foundation Server (ALM-IV)
- Microsoft Dynamics AX 2012 ALM with Team Foundation Server (ALM-III)
- Team Foundation Server 2010 Installation (ALM-II)
- Microsoft Dynamics AX 2012 Application Lifecycle Management (ALM-I)