HowTo: Take Control of an AX 2012 Backup Using PowerShell
A few days ago I posted a comment on Twitter about PowerShell possibilities and got a lot of feedback.
I assume there is strong interest in learning more about PowerShell capabilities applied to Microsoft Dynamics AX, and I’m preparing a long article (probably a series) on this topic that should be ready in the coming weeks. PowerShell is an extremely powerful and, at the same time, unusual tool. Developers usually see it as an admin tool (it is a console), while sysadmins often see it as a developer tool (it is code). Curious, right?
While I finish that article, and as a quick appetizer, a common issue in all AX versions is that after restoring a backup from one AX environment into another, there are scenarios where we cannot access the system because our user does not exist in that target application. Typical cases: restoring a customer backup into our own machine in another domain, or when our development user does not exist in the production application.
Regardless of why this happens, the traditional solution has been to edit the database manually, find the user table, and update the admin user’s SID with ours; or manually create a new user row. That is, in fact, the only solution. But getting your SID is not always straightforward, and this task is, by definition, automatable.
For that we can use a PowerShell script executed every time we restore a backup, allowing us to take control of the admin user automatically (all this code can be copied into a new .ps1 file and used as a cmdlet):
[CmdletBinding()]
Param
(
    [Parameter()]
    [string] $dbInstance = "localhost",

    [Parameter(Mandatory=$True)]
    [string] $dbName,

    [Parameter()]
    [string] $adDomain = [Environment]::UserDomainName,

    [Parameter()]
    [string] $adUser = [Environment]::UserName
)

Import-Module sqlps -DisableNameChecking

$ntAccount = New-Object System.Security.Principal.NTAccount($adDomain, $adUser)
$adSID = $ntAccount.Translate([System.Security.Principal.SecurityIdentifier])

$params = "adDomain = $adDomain",
          "adUser = $adUser",
          "adSID = $adSID"

Invoke-Sqlcmd -Query "
    SELECT ID, NAME, SID, NETWORKDOMAIN, NETWORKALIAS
    FROM [dbo].[USERINFO]
    WHERE ID = 'admin';
    " -ServerInstance "$dbInstance" –Database "$dbName" | Format-Table

Invoke-Sqlcmd -Query "
    UPDATE [dbo].[USERINFO]
    SET NAME = 'Admin',
    SID = '\`$(adSID)',
    NETWORKDOMAIN = '\`$(adDomain)',
    NETWORKALIAS = '\`$(adUser)'
    WHERE ID = 'admin';
    " -ServerInstance "$dbInstance" –Database "$dbName" -Variable $params

Invoke-Sqlcmd -Query "
    SELECT ID, NAME, SID, NETWORKDOMAIN, NETWORKALIAS
    FROM [dbo].[USERINFO]
    WHERE ID = 'admin';
    " -ServerInstance "$dbInstance" –Database "$dbName" | Format-Table
The script lets us pass the database and user data as parameters and also supports default values. When using defaults, it runs under the current user. Then it uses the SQL Server PowerShell module to execute the required update and prints values before and after execution so we can verify the result (or store it in a text file, just in case ;)).
This is the result:
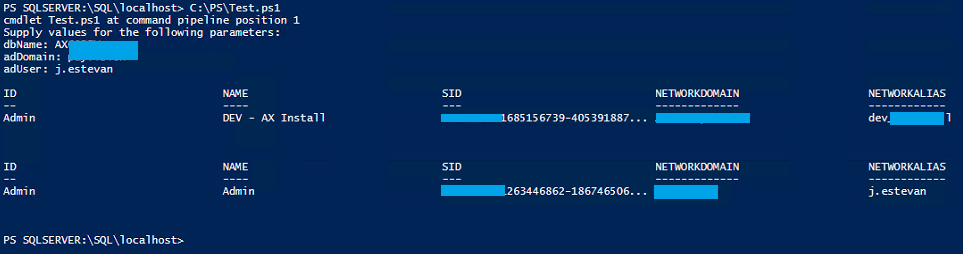
After running the script I can enter the target application because from that point my user is linked to the admin user in that environment.
More PowerShell in the next few days! :)