Introduction to PowerShell for Dynamics AX 2012 Developers (PS-I)
Table of contents
PowerShell (we will abbreviate it as PS from now on) is an amazing tool, among many other things, for administering servers and applications, including Microsoft Dynamics AX 2012. AX 2012 includes its own PS module, called “Microsoft Dynamics AX 2012 Management Shell”, with commands we will review in upcoming posts.
Those commands are very useful, but we can also get a lot of value from standard PowerShell features for many day-to-day tasks.
We will cover all of this in the next articles in this series. For now, we need to start with the most basic PS concepts so we can get full value from future entries.
How to Get Help
By now, everybody should know PowerShell is a Windows administration tool presented as a command console. It is an improved successor to the old msdos console from previous Windows versions and, like that console, lets us create and reuse scripts.
Depending on your Windows version, PowerShell may come preinstalled (newer versions), or you may need to install it manually. It can be downloaded for free from Microsoft. You can also download a free editor (included by default in some versions) to edit, debug, and run PS scripts easily: Windows PowerShell ISE.
The first commands (called Cmdlets in PS) we should learn are help-related commands. We will need them all the time. We can use Get-Help to retrieve help for any command, or to get a list of available commands. You can test the following and inspect the output:
# Help
Get-Help
Get-Help Get-Help -Full

# Help about a cmdlet
Get-Help process
Get-Help Get-Process -Examples
Get-Help Get-Process -Online

# Update local help from the internet
Update-Help
With these commands we can see how to search commands by keyword, inspect details for a specific command, jump to Microsoft online help pages, and update local help content from the internet.
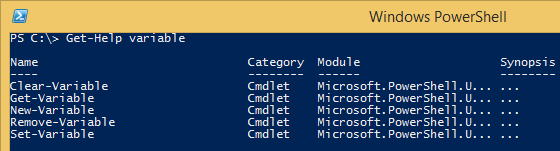
PowerShell has a steep learning curve, so we will definitely use these commands frequently, especially at the beginning.
Introduction, Pipes, and Aliases
Although PS is often described as the new version of the old msdos console, its usage is very different. The main difference is not only command names, but the object-oriented pipeline behavior.
PowerShell commands return objects, not plain text. Therefore, when we pipe the output of one command into another, the receiving command gets full objects (or object collections), including properties and methods, not just what was printed on screen.
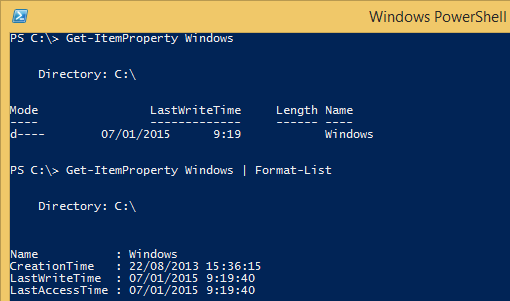
For example, Get-ItemProperty shows properties from a target object. If used with a file or directory, it returns detailed information:
PS C:\> Get-ItemProperty Windows
Console output may look similar to classic dir, but we can pipe Get-ItemProperty to another command to change formatting:
PS C:\> Get-ItemProperty Windows | Format-List
The next screenshot shows both outputs. You can see objects contain many more properties than those displayed by default.
Likewise, we can retrieve detailed information for all items in the current directory by piping several commands (for more formatting commands: Get-Help format):
PS C:\> dir | Get-ItemProperty | Format-List
As we have seen, PS commands use a Verb-Noun naming pattern. Verbs are limited and indicate action intent, while nouns define command families such as services, processes, etc.
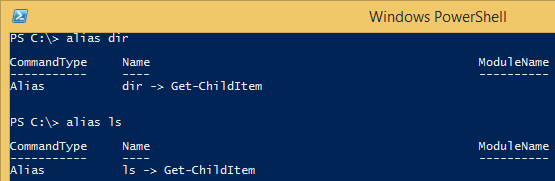
We also have “classic” aliases inherited from other shells, like dir, ls, rm, and so on. These are aliases for native PowerShell cmdlets. We can create new aliases or modify existing ones. To learn all alias management commands, run Get-Help alias. To inspect existing aliases, use alias, optionally with a search string:
Scripts
As with other shells, a major part of PowerShell power is writing scripts and saving them to files for repeated execution. Since PS handles objects, scripts can be much more advanced than in old msdos.
For example, with only the commands introduced so far, we can get file names from the current directory:
$list = dir
foreach ($item in $list)
{
    $item.Name
}
This script shows several useful concepts: storing dir output in a variable (a collection of objects), iterating over that collection similarly to other languages, and printing a single property (Name). In the last line there is no explicit cmdlet, only a value expression, and PS prints it because it is not piped elsewhere.
This script can be saved in a text file and reused whenever needed. If we save it as Example1.ps1, we can run it as many times as necessary with:
PS C:\> .\Ejemplo.ps1
If we want to import this script from another script to reuse functionality, we can load it with:
PS C:\> . (C:\Pruebas\Ejemplo.ps1)
Scripts can include single-line comments prefixed with # and block comments between \<# and #>.
Advanced Syntax
Interestingly, by using PowerShell native syntax (often not very intuitive), we can produce the same result as the previous loop with:
PS C:\> (dir).Name
Placing dir in parentheses treats returned elements as objects and accesses their Name property. Since output is not piped, it is printed.
Another example: to delete all files in a folder, these equivalent forms can be used (be careful with this code):
PS C:\> dir | Remove-item
PS C:\> (dir).delete()
Deleting everything is not always useful. If we want to delete only some files based on a condition, we can include that condition in cmdlets, for example (again, equivalent):
PS C:\Pruebas> dir "Prueba B" | Remove-item
PS C:\Pruebas> (dir "Prueba B").delete()
Or we can use PowerShell syntax with stronger filtering:
PS C:\Pruebas> dir | Where-Object { $_.Name.StartsWith("Prueba B") } | Remove-Item
The Where-Object cmdlet (alias: ?) filters an incoming collection and returns only items that satisfy a true/false expression. This cmdlet receives a lambda body, not a regular value parameter.
Inside the lambda, $_ represents each incoming element. We can apply any validation needed. If the expression evaluates to true, the element is sent to the next cmdlet; otherwise, it is discarded.
Because cmdlets expose .NET objects, we can use object properties and methods in these expressions. In this example, we filter items whose Name starts with Prueba B. The same syntax can be written in a more expanded (and often more readable) format:
dir
| Where-Object
{
    $_.Name.StartsWith("Prueba B")
}
| Remove-Item
We can force lambda-based processing with ForEach-Object (alias: %) to execute commands for each incoming element:
PS C:\> dir | ForEach-Object { $_.Name }
As mentioned, cmdlets are often chained in a single pipeline and commonly appear in short alias form, like this:
PS C:\> dir | ? Name -like "Prueba B*" | % { $_.Name }
In practice we use the syntax that is easiest for us to read and maintain, depending on habits and background. Still, it is important to know strict PowerShell syntax so we can understand scripts found in existing environments.
Parameters
For scripts and cmdlets to be truly useful, they should receive values through parameters. PowerShell again provides its own flexible model, from simple typed parameters to advanced defaults and validations.
A straightforward approach is declaring parameter names and types in function signatures as in other languages:
function Show-Message([string] $message)
{
    $message
}
PowerShell also has its own declaration pattern. The following syntax works in both functions and scripts:
function Show-Message
{
    Param(
        [string] $message
    )
    $message
}
The advantage is that we can attach modifiers, default values, and validations:
function Get-FileContent
{
    Param(
        [Parameter(Mandatory=$false), HelpMessage='File path']
        [ValidateScript({ Test-Path $_ -PathType Leaf })]
        [string] $fileName = 'c:\Test.ps1'
    )
    Get-Content $fileName # read file content
}
Calling examples (all valid):
Get-FileContent # uses default value
Get-FileContent 'c:\Test.ps1' # positional parameter
Get-FileContent -fileName 'c:\Test.ps1' # named parameter
There is plenty of information about parameter attributes in the official documentation and PowerShell help.
That is it for the introduction. In the next entries we will go deeper, but now we have a solid baseline to continue.
Posts in this series
- PowerShell and Startup Commands in Dynamics AX 2012 (PS-III)
- PowerShell for Automated Administration of Dynamics AX 2012 (PS-II)
- Introduction to PowerShell for Dynamics AX 2012 Developers (PS-I)