Version Control in Microsoft Dynamics AX 2012 Using Team Foundation Server Branches (ALM-VII)
In previous chapters we discussed how to install and configure Team Foundation Server, as well as the possibilities it offers to manage tasks and manage source code from our Microsoft Dynamics AX 2012 instance. We covered basic but essential operations to check code in and out from the server and the resulting benefits, such as storing complete object change history, reviewing object history, reverting to previous versions, discarding unconfirmed changes, etc.
However, there are problems basic source code management cannot solve. For example, in a regular ERP installation, while we provide daily support and small fixes, we are also running larger parallel developments. These parallel streams need to be integrated into production code somehow, but if we use the same server for development and maintenance, we eventually reach a point where all developments must be fully finished before clean and safe production deployment.
Likewise, if our company develops a product, we need to continue building future versions while supporting released versions, sometimes across multiple AX versions. How can we ensure an urgent hotfix built for one customer reaches all product versions that need it, in a clean and stable way?
Of course, this requires a good working method to keep everything organized and error-free, but also tool support. That is where (Branches) in version control systems help, including our Team Foundation Server.
Branching Strategies
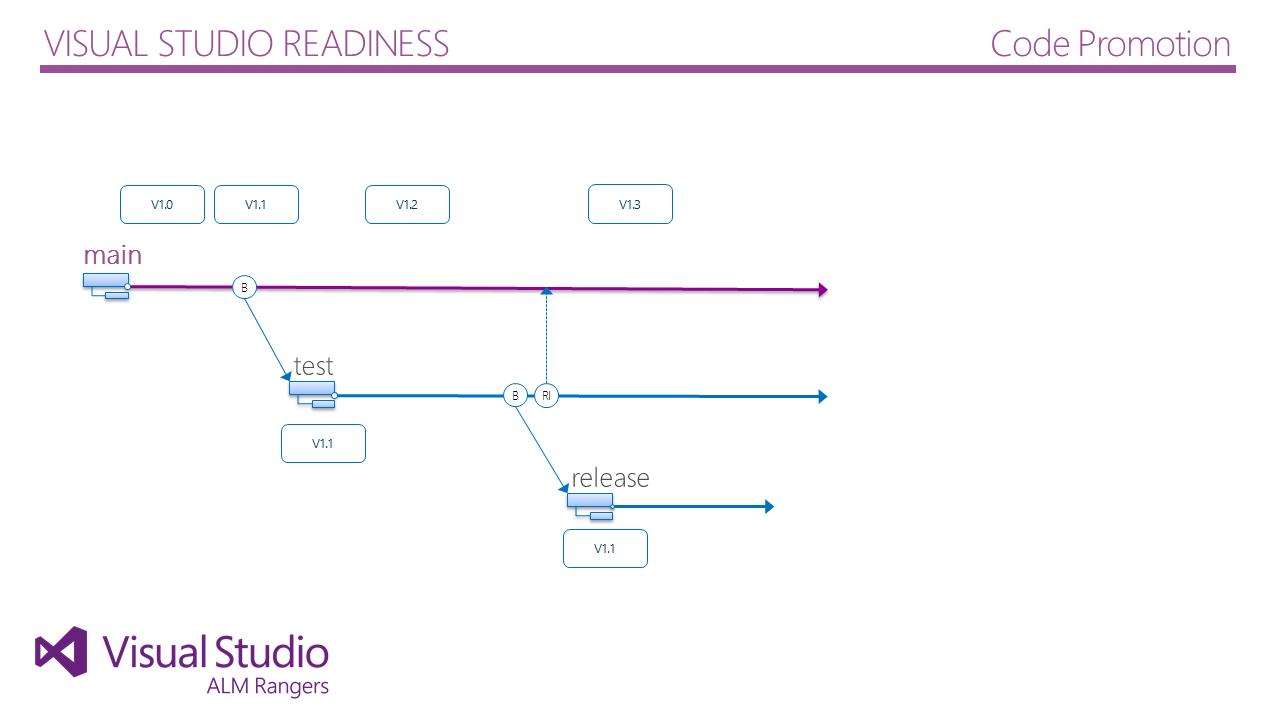
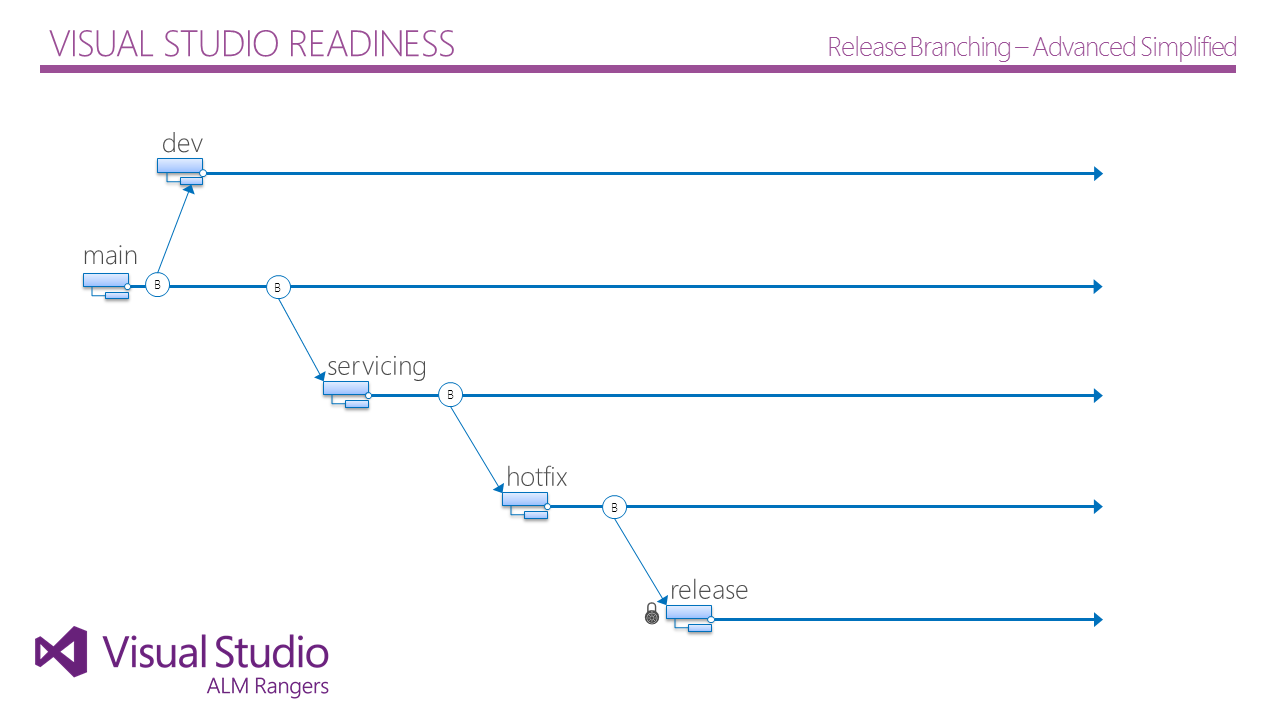
There are countless strategies to define branch structures, and this depends on number of teams, products, versions, etc. There is NO universal branching strategy. It must be thoughtfully designed because every strategy brings tradeoffs. A strong starting point is reading the Version Control Guide written by Visual Studio ALM Rangers, where most options are explained with pros and cons.
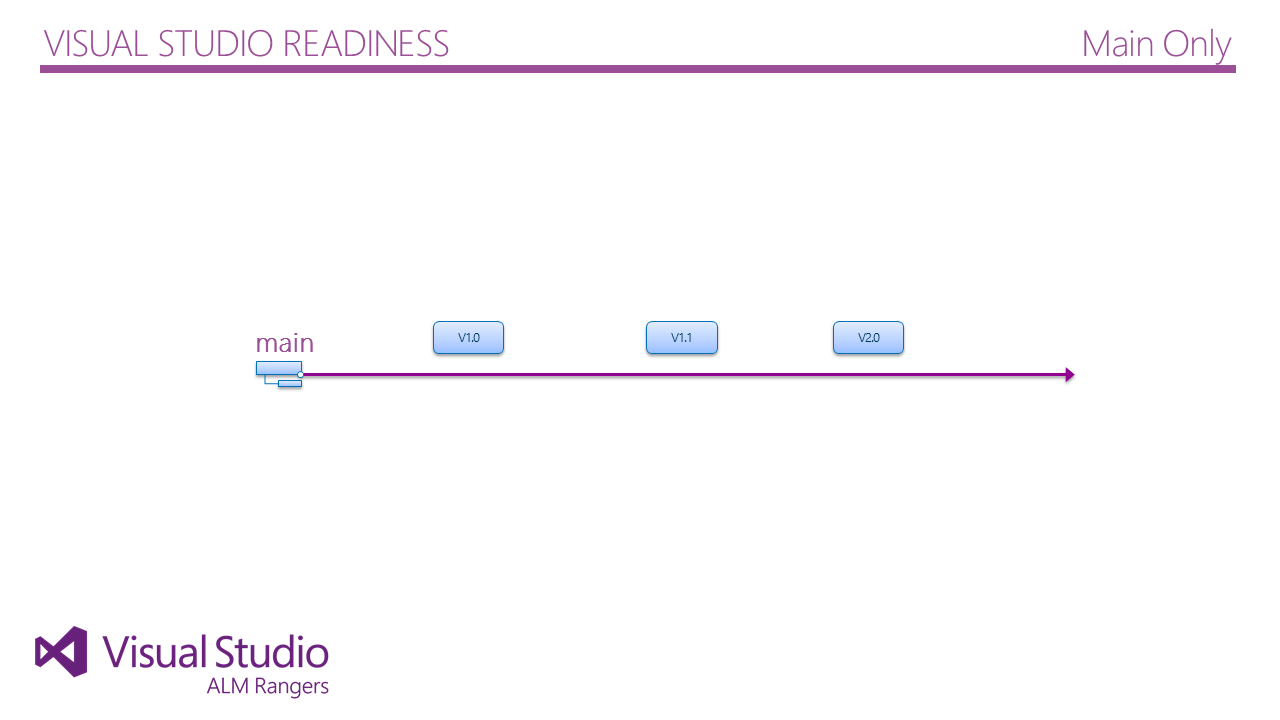
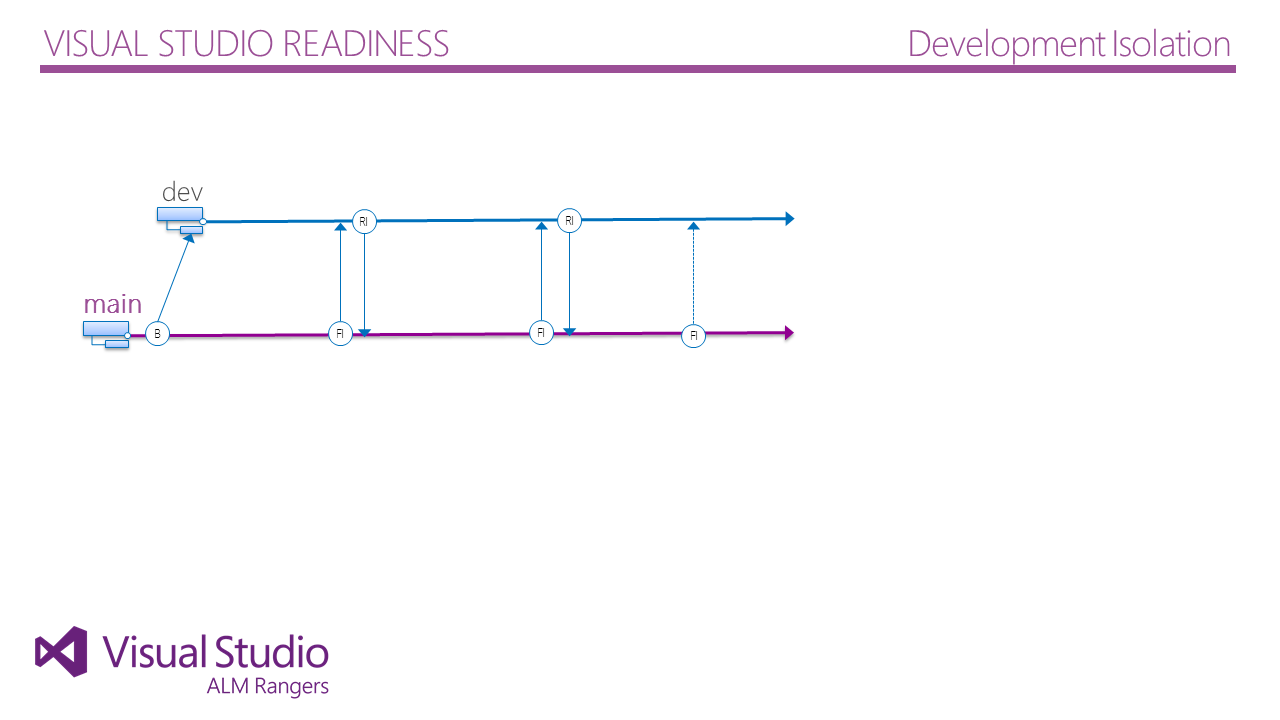
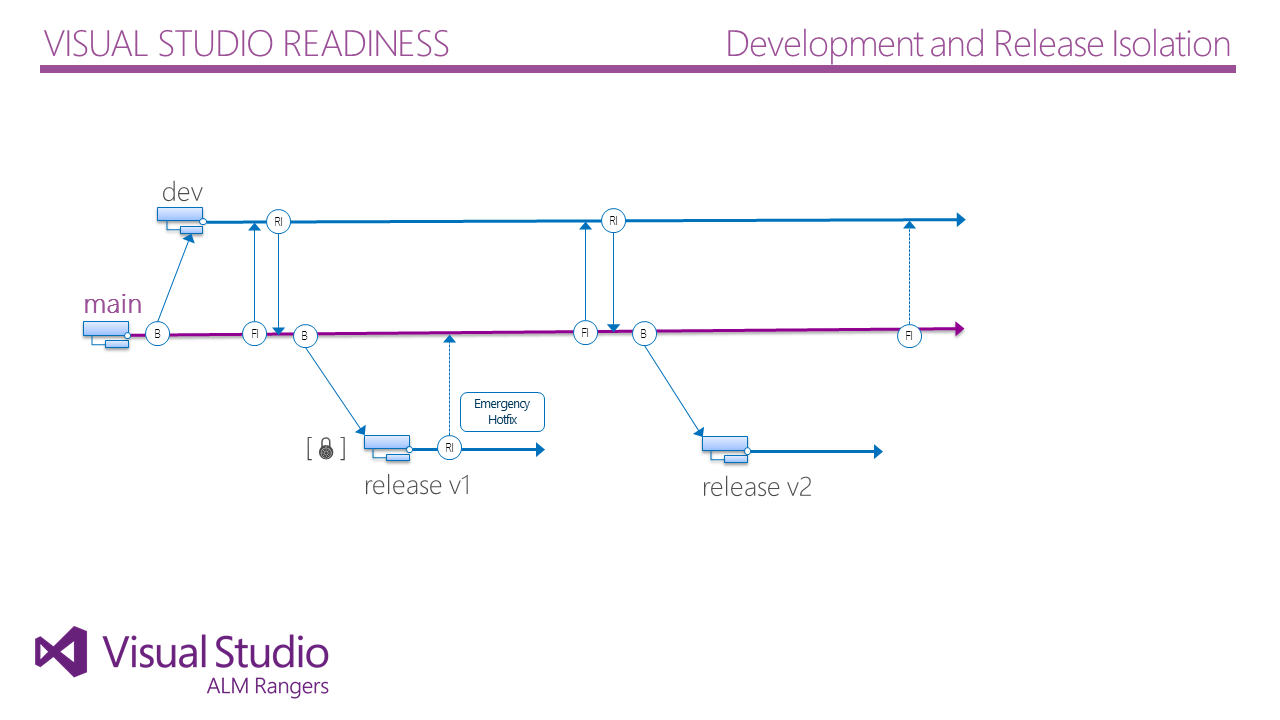
Following that guide, the ideal approach is to start simple and create new branches only when needed. The simplest strategy is not using branches, or using just one (Main Only), which is basically the same.
However, in practice using at least two branches is ideal to get value quickly, so we soon move from Main Only to fuller strategies such as Code Promotion or Development Isolation, and with more maturity we end up with an adaptation of one or several Ranger recommendations.
Here are basic strategy diagrams as a starting point and idea source (click to enlarge):
It is important to insist that creating new branches increases maintenance workload. Therefore, always start from simple to complex, and do not create branches unless they clearly provide benefits.
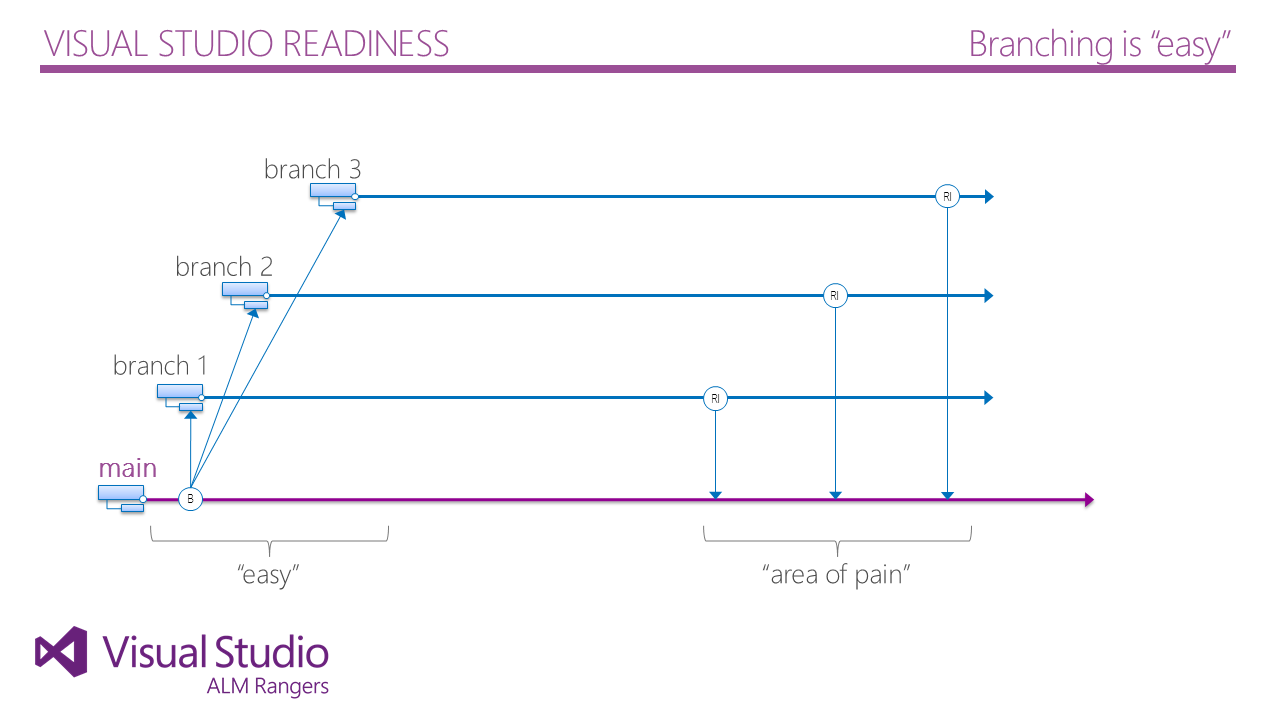
Branching is 'easy'
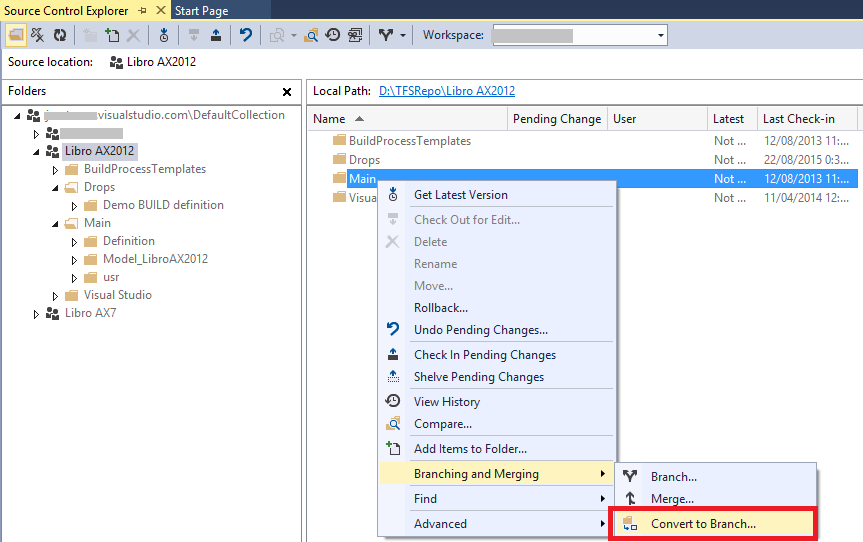
Creating New Branches from Visual Studio
Creating branches in TFS is straightforward. Branches are directories in source control, so once directories are created we can right-click in Visual Studio Source Control Explorer > Branching and Merging > Convert to Branch. Everything inside that folder becomes part of the branch and propagates to other branches during integration.
To create child branches (for example from Main we create Test in a Code Promotion strategy), right-click existing branch > Branching and Merging > Branch, creating a new branch dependent on the original.

This way we can create all required branches according to needed structure. Right-click a branch > Branching and Merging > View Hierarchy to analyze branch relations and adjust properties until structure is finalized.
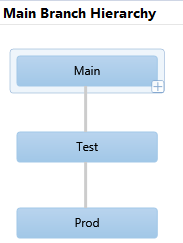
Branch Hierarchy
Connecting to Branches from Dynamics AX 2012
Working with branches from Dynamics AX is fully transparent. Despite this article title, AX does not really work with branches; for our X++ editor, each branch is simply a different application.
It is important to keep this in mind when connecting to different branches from Dynamics AX, especially when switching branches, because full sync from TFS may be required and can take time and cause DB conflicts if branches are very different.
Likewise, if using multiple branches, consider this when defining local repository folder structure. It is recommended to use different folders per branch to simplify synchronization when switching. Otherwise, changing branch may require deleting the local repository folder and re-syncing from scratch.
That said, to connect to a branch from Dynamics AX we only need to set it in Team Foundation Server configuration (Version Control > Version Control Parameters), as we saw in a previous chapter.
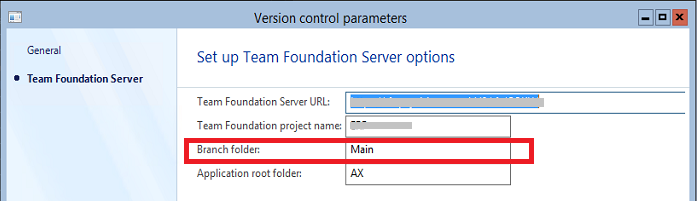
Configure branch in Dynamics AX

Include branch in local repository
Once environment is configured, code check-ins are done on the selected branch, and it is Visual Studio responsibility to promote changes to other branches according to selected strategy.
The Legendary MERGE
We have seen how easy it is to create branches and connect to them from Dynamics AX. Now what? Up to this point we have not gained much versus a single-branch approach. The real value appears when promoting code between branches with Visual Studio tools, specifically MERGE.
All source control systems provide this function. What it does is promote code from one branch and integrate it into another, resolving conflicts caused by parallel edits automatically when possible, and providing tools for manual resolution when not.
Common merges are from Development to Main or from Main to Test or Release, depending on strategy. We can also merge in reverse, for example to refresh development branches from Main, or to bring an urgent hotfix from a lower patch branch into Main. This reverse merge is often referred to as Refresh.
Merge integrates changes automatically most of the time, but it may find conflicts with versions already integrated by other developers and then manual resolution is required. Visual Studio provides a comparison tool very similar to AX Compare, where we can choose our version or server version, and use advanced functions to compare against previous versions and resolve multiple conflicts at once. It is intuitive and supported by all Visual Studio versions (2010 and 2013 shown), both for on-premise TFS and cloud Visual Studio Online.
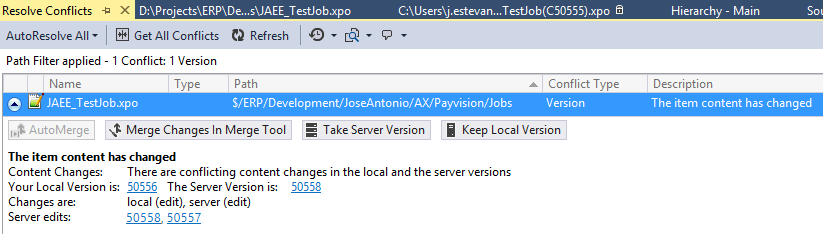
Conflict detector in VS
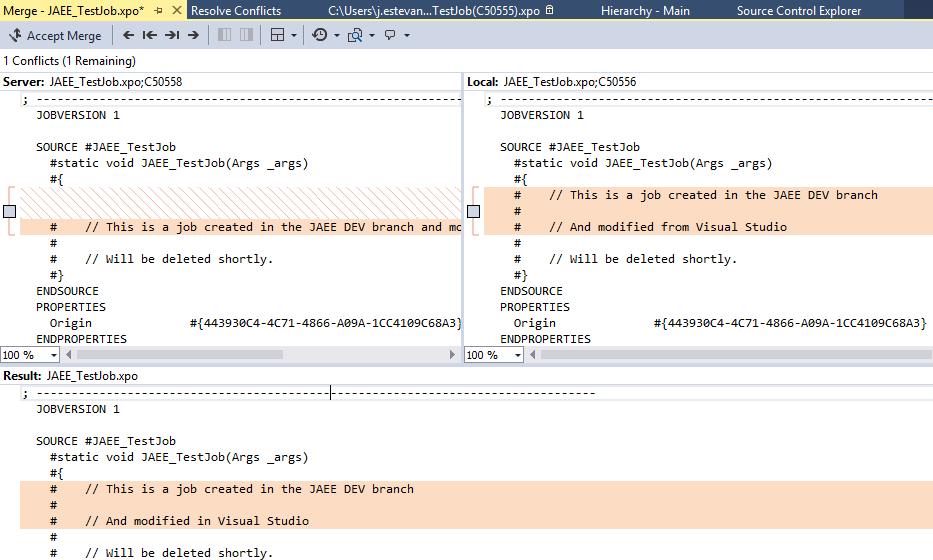
Comparer in VS 2013
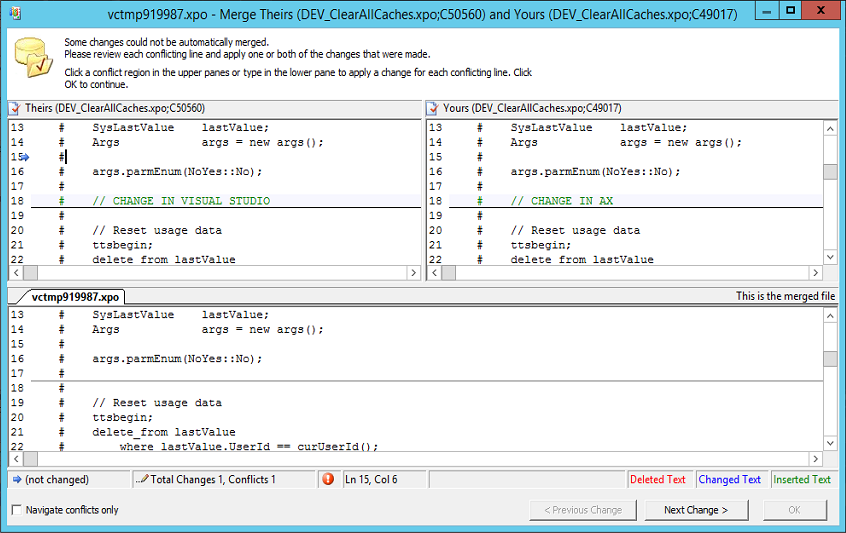
Comparer in VS 2010
Fewer conflicts appear when branches are integrated frequently, which benefits incremental working models with short iterations and small tasks, such as agile methodologies.
Branches and Traceability - Following the Changes
Using branches and merge processes gives us strong change traceability. Of course, traceability depends on how we work, but if we enforce simple rules, such as making each check-in belong to a single work item and always linking check-ins to work items, we can move only selected check-ins between environments through merges. In practice, this allows moving to Test or Production only finished requirements while unfinished work remains in development environments.
In addition, we always know when each change moved between environments (between branches), when a change was first built (we will see this in the next chapter), why a change was made, and in which environments it has been propagated. For this we use work item and change set relationships, plus change history. In the image below we can see a change already moved to Test but not to Production:
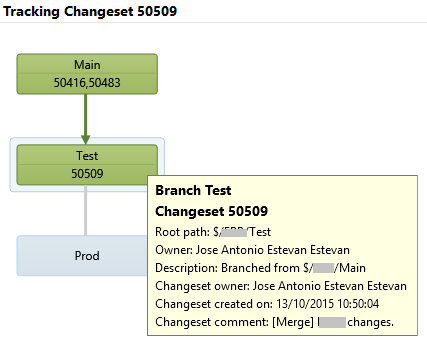
Change-set history tracking
Isn’t it great? :)
In the next chapter we will close the loop of this long article series by discussing automated build processes, and in later posts we will cover the full lifecycle and some practical tricks. Do not miss them!
Posts in this series
- Automatic BUILD Processes with TFS and AX 2012 (2/2) (ALM-X)
- Automatic BUILD Processes with TFS and AX 2012 (1/2) (ALM-IX)
- Version Control in Microsoft Dynamics AX 2012 Using Team Foundation Server Branches (ALM-VII)
- Source Code Control with TFS in Microsoft Dynamics AX 2012 (ALM-VI)
- Microsoft Dynamics AX 2012 ALM with Team Foundation Server (ALM-III)
- Team Foundation Server 2010 Installation (ALM-II)
- Microsoft Dynamics AX 2012 Application Lifecycle Management (ALM-I)